WebMail User's Manual

WebMail is a web-email gateway which allows you to read and process your email from a web browser running on any machine with access to the internet ( or your intranet ). It is a full featured email client package which provides facilities to read new mail, send and forward messages, send and view attachments, use folders to organize your messages etc.
WebMail uses POP and IMAP protocol. When WebMail is talking to an IMAP server your messages are left on the server. You can see and manipulate all the same email messages and folders you can access from a standard IMAP email client, but from any web browser anywhere on the net. You can also swap backwards and forwards between any other IMAP client and WebMail.
Briefly . . .
To use WebMail, point your World Wide Web browser at the appropriate URL such as:
http://nice.co.nz/cgi-bin/WebMail.cgi
Then enter your Username and Password to login and process your new mail. It's that simple but for more details read on...
For quickly getting started...
For more details...
This User Manual guides you through the various pages of WebMail, noting the functions of all of the Buttons, Links *, Check Boxes and Text Fields that you will find on them. In addition to normal links to related information there are glossary definitions for many of the technical terms and acronyms. These links to glossary definitions are shown thus server *
New users in particular should find these links to the Netwin Glossary helpful.
Here is the instant three step guide...
| 1. | Start your web browser | - e.g. Netscape, Internet Explorer etc. |
| 2. | Point it at the WebMail page | - your Internet Service Provider (ISP) or Computer Department will have told you the URL to use, e.g. http://nice.co.com/cgi-bin/WebMail.cgi. |
| 3. | Depending on how they have setup WebMail you might see a
login page if so enter your username and password (then click the 'Login' button) |
- again you will probably have been given a username and password to use |
| Bingo - you're at your Mail! |
For more detailed information please read through the next few sections.
Before you can use WebMail you need to login. When you run WebMail you will be presented with the login page:
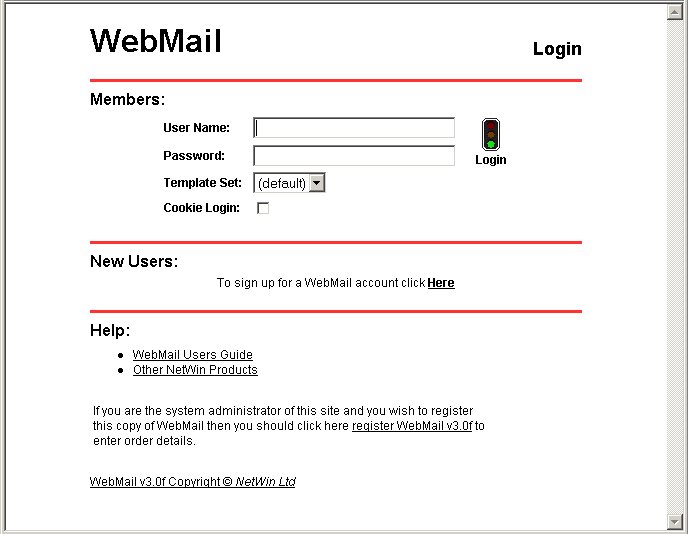
To login you must first supply a valid username and password. This username and password should have been supplied to you by your computer service center.
The WebMail Administrator will have assigned a default Mail server for use with WebMail. So, as a user, as long as you use the correct URL* in your web browser then you'll automatically log in to the correct location. So you do not have to enter anything in the 'Enter Host' box.
Once you are logged in, WebMail will check the Mail server and will display the E-Mail that are available. You should see a screen like the following:
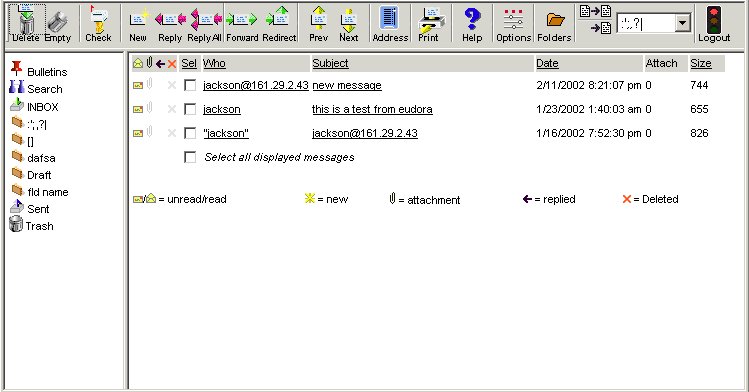
The screen is divided into three portions: the Menubar, the Folders bar and the EMail List.
- Delete
- This deletes the messages selected in the EMail List
- Empty
- This deletes all the messages from your trash folder and all messages with the marked for deletion flag set
- Check
- This will download any new emails you have recieved since you logged in
- New
- This creates a new email message
- Reply
- This replys to the messgae currently being viewed
- Reply-All
- This replys to the messgae currently being viewed, and to all the people in the To: and CC: feilds as well
- Forward
- This will send the message on to a new address, using your address as the from and reply-to address
- Redirect
- This will send the message on to a new address and will keep the original from and reply-to address
- Prev
- This will view the previous message in the list
- Next
- This will view the next message in the list
- Address
- This will open your address book for editing
- This will print the message you are currently viewing
- Help
- This will open the help page in a new window
- Options
- This will open your options page so you can customise your WebMail
- Folders
- This will open the folders page so you can create, delete and edit folders
- Copy and Move
- These buttons let you copy or move the selected messages from the EMail list to another folder
- Logout
- This will end your WebMail session
- Bulletins
- This will take you to your Bulletins folder so you can view messages broadcast by the admin
- Search
- This will take you to the search page so you can easily search through your messages
- Inbox
- This will take you to your inbox folder (Note: this will not check for new messages)
- Sent
- This will take you to your sent messages or outbox folder
- Trash
- This will take you to your trash folder
- Personal Folders
- These will take you to folders that you have created yourself using the folders page.
- Email Flags


- These flags let you quickly see some information about the message
You can toggle the Read, Replied and Marked for deletion flags by clicking on them
- This message has been read
- This message has not been read
- This message has one or more attachments
- This message has no attachments
- You have sent a reply to this messgae
- This message has not been replied to
- This message has been marked for deletion
- This message has not been marked for deletion
- This message has been downloaded since your last login
- Sel
- This column lets you select or deselect messages in the list
Clicking on "Sel" will select or deselect all the messgaes- Who
- This column says who sent you this message
If you are in the Sent folder then this column says who the message is addressed to
Clicking on "Who" will sort the list alphabetically on this column
Clicking messages in the column will open the message for viewing- Subject
- This column says the subject of each message
Clicking on "Subject" will sort the list alphabetically on this column
Clicking messages in the column will open the message for viewing- Date
- This column says the date and time the message was sent
Clicking on this column will sort the messages on the date they were sent- Attach
- This column says how many attachments each message has
- Size
- This columns says the size of each message in bytes
Clicking on "Size" will sort the messages on size
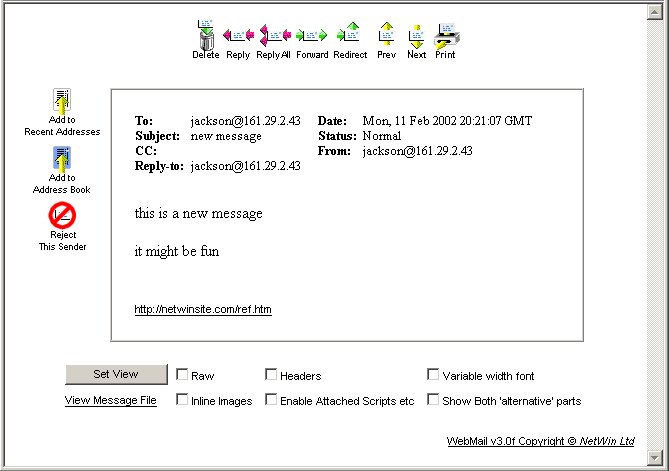
When you first login you will be viewing your INBOX folder. Clicking on the subject or sender name of an EMail will display a screen like the following:
- Delete
- This deletes the message currently being viewed
- Reply
- This replys to the messgae currently being viewed
- Reply-All
- This replys to the messgae currently being viewed, and to all the people in the To: and CC: feilds as well
- Forward
- This will send the message on to a new address, using your address as the from and reply-to address
- Redirect
- This will send the message on to a new address and will keep the original from and reply-to address
- Prev
- This will view the previous message in the list
- Next
- This will view the next message in the list
- Add to recent addresses
- This will add the address of the person who sent this message to your recent addresses list
- Add to address book
- This will add the address of the person who sent this message to your address book
- Reject this sender
- This will delete this message and automatically delete all messages you recieve from this person in the future. Use this feature carefully!
- View Message File
- This will display the raw message as WebMail recieved it from the pop server
You can also change the viewing options of the E-Mail selected. There are 6 options available. Make sure you click the "Set View" button after selecting your viewing options.
- Raw
- This forces the body of the message to be display as it is is stored on the IMAP or POP server
- Headers
- This forces the complete headers of the E-Mail to be displayed
- Variable width font
- This will display the body of the message in a variable width font instead of a fixed width font
- Inline images
- This will make WebMail attempt to display images and other attachments in the body of the message
- Enable attached scripts etc.
- When viewing HTML inline, WebMail for security reasons automatically removes scripts, forms and applets, checking this box will stop these from being removed. This setting unlike the others will not be saved and you need to check this each time you want to see the srcipt, forms and applets
- Show both 'alternative' parts
- This will make WebMail display both the plain text and the HTML parts of a multi-part message
Once you have logged in to WebMail correctly, you will be presented with a menubar will be displayed at the top of the screen. On this menubar is the 'New' button. Pressing this button will cause the following screen to be displayed.
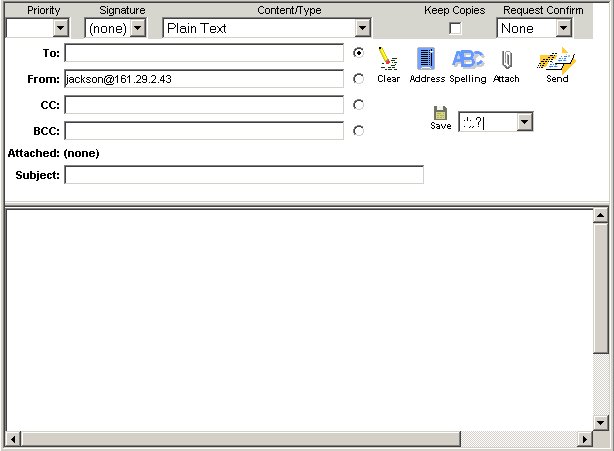
This screen will allow you to enter the E-Mail deatils and then send the E-Mail.
E-Mail Recipients ( To, Cc and Bcc ) There are three ways a person can receive an E-Mail depending on which field you enter their E-Mail address.
- The 'To' field is who will receive this E-Mail message
- 'Cc' stands for carbon copy and these E-Mail address receive a copy of this E-Mail, the recipients do see who gets sent a carbin copy.
- 'Bcc' is Blind Carbon Copy, which is very simular to 'Cc' expect that the recipients do not get told who gets a Blind Carbon Copy.
You can enter an E-Mail, distribution label or an address book nick name. The distribution label and address book nick names are expanded out before they get sent.
ie. If you entered: Lynden@1.2.3.4, ralph, work_people Into any of the three fields were, ralph is an address nick name for 'ralph@1.2.3.4' and work_people is a a distribution label for 'lynden@4.3.2.1,john@4.3.2.1' then the finial field will be: Lynden@1.2.3.4, ralph@1.2.3.4, lynden@4.3.2.1,john@4.3.2.1
From address ( From ) This is the address that people will be used when people reply to this message
Subject ( Subject ) This is the subject line of the message. This is suppose to give an indication about what the E-Mail is about so that the recipients can determine if they wish to read the E-Mail or not.
Attachments ( ) You are allowed to attach any file to your E-Mail. Some admins have limited the size of E-Mails that can be sent and you should talk to your admin about this.
Clear ( ) This button will clear the last selected 'To, Cc or Bcc' field. Removing all the addresses typed in.
Address Book ( ) This button will popup the quick address book. Allowing you to select people from your address book, to enter directly into the 'To, Cc or Bcc' fields. For more details on the address book and the look of the popup address see Address Book Management.
Check Spelling ( ) This will take you to the spell checking that is available in WebMail. Allowing you to change misspelt words or add new words to your user dictionary.
Save Draft ( ) E-Mails that you plan to use over and over again, or E-Mails that you do not have time to finish you can save. Saving the message as a draft will store the message on the Mail server until you are ready to send it. You need to select a folder to store the draft message in.
Sending Options
- Priority
- This allows you to set the priority of your message to normal or "Urgent"
- Signature
- This lets you select what signature to use with this message
- Content/Type
- This lets you select the type of message you are sending. For plain text messages use "Plain Text". For HTML messages use "text/html"
- Keep Copies
- When this box is checked WebMail will save a copy of your message into your sent folder when you send the message
- Request Confirm
- This allows you to request a confimation that the person you have sent the message to has opened your message (Note: this does not guarantee that they have read your message, just that they have opened it)
Send E-Mail ( ) Once you have finish writting the E-Mail message you must press this button to send the message
Pressing the 'options' button pressing this will cause the following screen to be displayed.
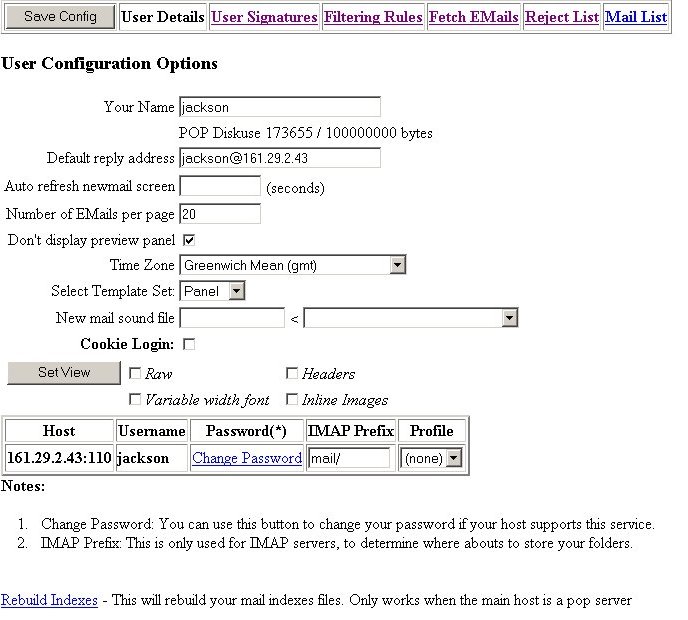
The above screen displays all the user options that you can setup. Allowing you to setup your Real Name, Signature, Multi-Host and Mail Filtering Rules. This screen could vary from one displayed above.
- Save Config
- Pressing this button will save the changes in the current page you are viewing
You MUST press this button for WebMail to be able to see your option changes- User Signatures
- This will allow you to edit your user signatures for each user profile
- Filtering Rules
- This allows you to setup filtering rules for new messages. eg, you might setup a rule to move all messages from mum@hotmail.com to your mum folder
- Fetch Emails
- This allows you to multiple email accounts at the same time using WebMail
- Reject List
- This allows you to add or remove addresses from your reject list. Messages from addresses on your reject list will be automaticly deleted when you check mail
- Mail List
- This will take you back to the email list page
- Your Name
- Set this to what you would like WebMail to call you
- POP diskuse
- This shows how much disk space your WebMail account is using, and how much you are allowed to use
- Default Reply Address
- This is the default address that you want people to send messages to when replying to your messgaes
- Auto-Refresh new mail screen
- You can set this feild to make WebMail automatically check mail for you while you are viewing the email list page
Leave this feild blank to turn this feature off- Don't display preview panel
- This checkbox turns off the preview of the message in the lower half of the email list page
- Time Zone
- This allows you to select the timezone you are using WebMail from
- Select template set
- This allows you to change the look or "skin" of WebMail
- New Mail Sound File
- Selecting a file here will make WebMail play an alert whenever you download a new message
- Cookie Login
- Checking this box will make WebMail store a cookie on your machine so you will be automatically logged in without having to enter a username and password.
You should NOT use this feature on public machines- Set View
- This allows you to set your default viewing options while viewing a message
- Change Password
- This will allow you to change the password to your WebMail account
- IMAP prefix
- This lets you change the folder prefix that WebMail uses when connecting to your mail server. You will not usually have to change this setting
- Profile
- This lets you select what user profile (signature) to use
- Rebuild Indexes
- Clicking this link will make WebMail delete it's message index and rebuild it from your POP folders and the mail server. You should not usually need to click this link but it can be a good thing to try if a message dissapears
Pressing the 'Folders' button will cause the following screen to be displayed.
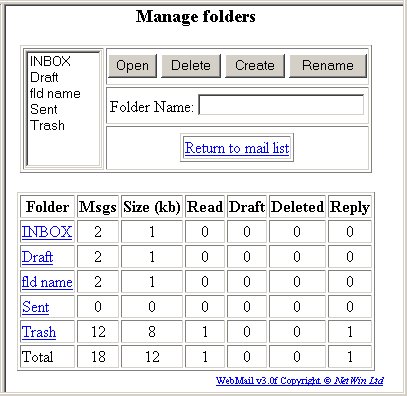
This screen allows you to change and maintain your Mail folders.
You can rename, create and delete folders.
WARNING: When you delete a folder you will also delete all the E-Mail within this folder.
The Folder List at the bottom of the screen displays every folder and the number of messages, total size of all the E-Mails as well as some stats on the number of E-Mails that have been read, are drafts, are marked for deletion and have been replied to.
Clicking on the folder name in this list will also take you directly to that folder.
Pressing the 'Address' button will cause the following screen to be displayed.
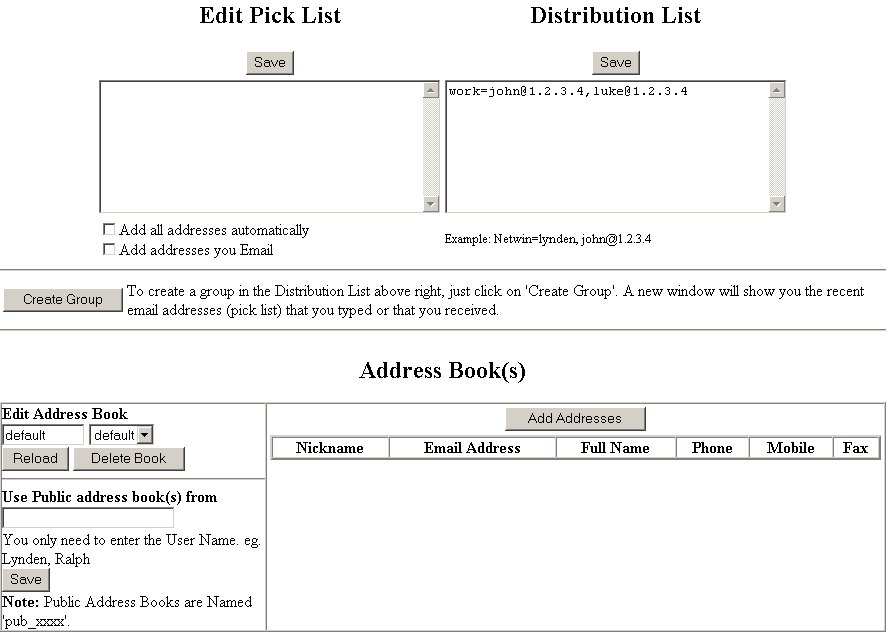
In the top left of the screen you can see the Pick List text box.
This is the 30 most commonly used E-Mail address. When the check box 'Add
addresses automatically' is checked then any from address of an E-Mail that is
viewed or the To, Cc, and Bcc of any sent E-Mail will be automatically added to this pick
list.
You can manually change, remove or add new E-Mail address to this list and then press the
'save' button.
Also when you view any E-Mail their is also a button called 'Add to Recent Addresses'. When you press this button the From address of the
E-Mail is added to the pick list.
In the top right of the screen you will see the distribution list. The distribution list lets you save time in retyping multiple E-Mail address. If you have a group of people that you are continually sending E-Mail to you can setup a label (ie work) where you just have to type this in instead of everyones E-Mail address every single time. You are also allowed to associated address book names in distribution lists.
The above example has setup 'work' to be associated with 'john@1.2.3.4' and 'luke@1.2.3.4'
This screen display the E-Mails in the selected address book, in this case the default address book. If you wish to change the detail of a signle entry, all you need to do is click on the nickname and you will be display the users address book settings.
To add an address book entry click on the 'Add Address' button and you will see the following screen:
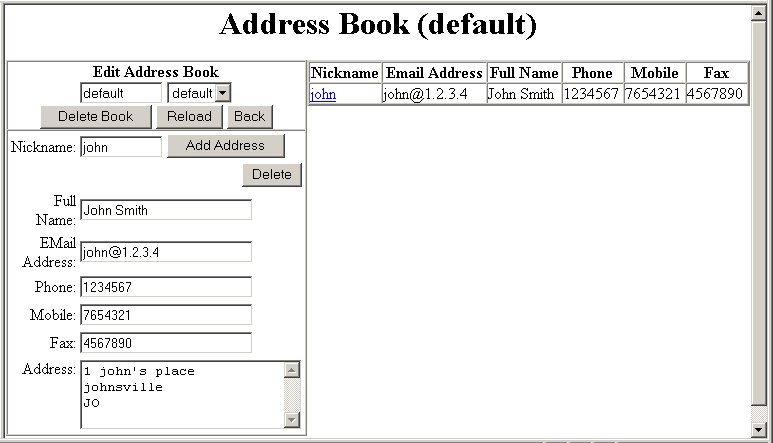
This allows you to enter Fullname, EMail address, phone numbers and street address
To add an user to the selected address book, all you do is enter the details including the Nickname. Then press the 'Add' button to add to the address book. You will now be able to just type the nickname in WebMail feilds instead of the entire email address
Each nickname must be unique. If the nickname already exists then the new one will replace the old one. Clicking on the nickname on the right will load that users details in to the editable feilds.
The ' '
button is also available in the creating an E-Mail screen. This makes the following to
come up in a popup window.
'
button is also available in the creating an E-Mail screen. This makes the following to
come up in a popup window.
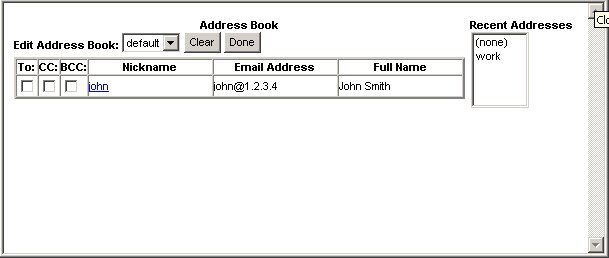
Clicking on a nickname in this case will copy the nick name into the selected 'To, Cc or Bcc' field so you can quickly find and select an address from your address book. To paste multiple addresses quickly you can select what addresses you what in what feilds using the checkboxes on the left. Clicking 'Done' will paste these addresses into the selected feilds.


